
Yosemite’s scenery is especially stunning during the winter months. You’ll find a halo of snow along the high peaks and clinging to ledges along the famous cliffs. The park is open, and in one of its most-quiet and majestic seasons. Even if you’ve visited before in another season, you’ll find winter in Yosemite to be a unique and magical experience.
On most days, getting around in winter is easy enough with just a little extra preparation. Let’s get into the details so you know exactly what you need to do for a fun and easy Yosemite winter adventure.
When and where are Chains Required in Yosemite?
When the roads start to get snowy, rangers set up chain control areas around the slippery sections to help you make sure you get where you are going safely.
Everyone entering a chain control area must have chains or another traction device with them in their vehicle. It’s a federal law. That includes rental and four-wheel drive vehicles.
However, just because you need to have them with you, doesn’t mean you have to install them on your car. There are two factors that play into whether or not you will have to put chains on your vehicle. One is the current road condition, and the second is how much traction your vehicle has.
When to Bring Chains?
The park service strongly recommends having chains if you’re visiting Yosemite between November and March. You might even need them as early as September or as late as May. The weather can change quickly in the mountains and even the best forecasts can be off. Be sure to check on weather conditions right before your trip.
What about other Traction Devices?
If you don’t want to install tire chains on your vehicle, choose Tire Socks or Snow Socks instead. These textile tire coverings provide less traction than a good pair of snow chains, but they are easier to install and fulfill the legal requirements. This is an excellent choice for cars that don’t have the clearance for regular chains or cables or rental vehicles that don’t allow chain installation on their vehicles.
Plastic devices, straps and other emergency or alternative ‘tire chains’ do not meet the legal requirement.
Where to get Chains that Fit?
Finding tire chains or snow socks is as simple as a quick Google search. Many stores carry tire chains in the winter, including automotive stores like Les Schwab or major retailers like Walmart. You can also order them online.
Diamond pattered chains, like the Quick Fit chains available from Les Schwab are more expensive, but provide excellent traction and are easy to put on. As of this writing, Les Schwab explicitly allows you to return unused chains for a full refund at any Les Schwab Tire Center with proof of purchase. You may also be able to return un-opened chains at stores like Walmart. Please double check this before you buy.
An alternative to chains are snow socks. These textile traction devices provide less traction and are less durable than a standard snow chain or cable chain, but they meet the requirements and they are much easier to put on. Snow socks are often a good solution for rental cars. We’ll talk about that more later.
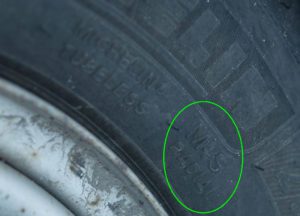
Look for an M+S rating on the side of your tires to see if they are Mud and Snow rated.
In order to get chains or snow socks that fit your vehicle, you’ll need to know the size of your tires before you go into the store. These will be printed on the side of the tire. Take a picture of the side of the tire before heading into a store to pick some up. While you’re looking, this is a good time to confirm that your tires are Mud and Snow rated. If they are, you’ll see a M+S designation on the tire as well. This information is important to know when you’ll need to put chains on your vehicle. This will be important to know when you have to put those chains on your vehicle.
Where Can I Go In Yosemite Without Chains?
There aren’t any specific regions of the park that always require or don’t require chains in the winter. If it’s February, but the roads are dry and snow free, you won’t encounter any chain control areas. If it’s May, and a huge cold storm just rolled in, all roads within Yosemite National Park could have chain controls in place.
However, in general, you’re more likely to have chain controls at higher elevations and less likely to have them on lower elevation roads. For example, as one of the higher winter roads, the Badger Pass Road often has some level of chain control requirement in the winter.
What Are the Current Road Conditions & Chain Requirements?
Chain controls are not unique to Yosemite. You might also encounter chain controls on California Highways outside the park. You can get information about those road conditions outside the park on the Caltrans website, or by calling 1-800-427-7623.
The best way to find out the current road conditions inside Yosemite Park is to call the road conditions hotline. This is absolutely the most up-to-date information.
For current road conditions dial 209-372-0200, and then press 1 and 1 again.
How Will I Know When To Put My Chains On?
 Plan ahead by calling the road conditions hotline, then look for the chain control signs.
The Road Conditions Hotline is 209-372-0200 (press 1 and 1 again).
You’ll find chain control signs located close to a wide pull-out that will allow you to pull safely out of the flow of traffic to put your chains on. Don’t pass this up! Not only can you get a citation for driving past these points, sometimes the conditions will deteriorate before you can get to the next safe place to pull off the road. Waiting until you’re stuck or slipping and then putting your chains on in the middle of the road while hoping other traffic will not slide into you is a bad alternative.
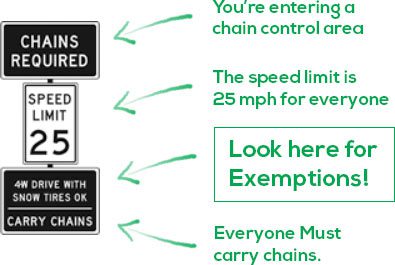
These signs will not only tell you where you need to put your chains on but also whether you need to put chains on your vehicle.
R1, R2 and R3 Exemptions
There are three levels of chain controls. If your vehicle meets certain requirements you can leave your chains in your car without having to put them on.
R1 – Autos & Pickups Snow Tires OK. This is the least restrictive level, cars and trucks (less than 6,000 pounds) with mud and snow-rated tires don’t need to put chains on as long as the tread of the tires is 6/32 of an inch or deeper. If your tires are mud and snow rated, they will have something similar to M+S written on them. That’s something to look for when you purchase the chains/snow socks that you are required to carry.
R2 – 4W Drive with Snow Tires OK. If you satisfy the requirements for R1 and you have four-wheel or all-wheel drive engaged, you don’t need to put chains on. For this reason alone, if you are renting a car for your winter Yosemite trip, it may be worth it to upgrade to an AWD or 4WD vehicle.
R3 – No Exceptions. That’s clear, right? At this level everyone needs to put their chains on. Roads are rarely at R3. If the conditions are this slippery, the road is usually closed.
What about Rental Vehicles?
Often car rental companies don’t allow chains. Installing them on your rental vehicle violates the rental agreement and leaves you responsible for any damage that occurs. This can be a tricky situation, but in this case, snow socks are a great solution. These textile traction devices are easy to install and are allowed by most car rental agencies. While snow socks provide enough traction to meet the chain requirements, keep in mind that chains or snow socks are not fool-proof. You still need to exercise caution when driving on snowy or icy roads.
Keep in mind that if you upgrade to a 4WD or AWD rental vehicle, you are unlikely to have to put chains on the vehicle. You do still legally have to have chains in your vehicle, but since usually you won’t need to put chains on except in the rare event of R3 conditions, you would probably be able to return those unused chains or snow socks if you purchased them from a store that allows that.
Tips on Snow Chain Installation
Once you know how to do it, it only takes a few minutes to stop and put your chains on when needed. Different cables and chains are installed differently, so it’s best to follow the instructions that come with your chains.
Still, here are a few general tips to make it as quick and easy as possible to get the chains on and get on your way.
- Practice ahead of time. Unless you are hoping to return your chains, take the time to practice installing them somewhere warm, comfortable and dry, it’s going to make it so much easier when you’re outside in the snow. At the very least, watch a how-to video so that the process is fresh in your mind before you arrive.
- Chains and snow socks go on the drive wheels. That means putting them on the front wheels for a front-wheel drive and on the back wheels for a rear-wheel drive. For a 4WD or AWD they can go on either the front or the rear, but you want them to be under the wheels that have the most weight so they can bite into the snow and ice.
- Roll back and forth to test the chains before pulling into traffic. You will need to roll back and forth a little to get your chains or snow socks onto your vehicle. In addition to that, try pulling ahead 10-15 feet and then backing up again. This will give your chains a chance to settle into place and allow you to troubleshoot any problems before you leave the safety of the pull out. For chain installations, you can do this a couple of times until you’re sure the chains are as tight as they can be. This will save your chains and your vehicle. A tightly fitting chain will be easier to drive on and is less likely to break.
- Make sure the chains are attached on both sides of the tread. This is one of the most serious mistakes you can make when installing your chains, and it happens all the time to inexperienced chain installers. The cable or chain needs to have tension on the inside and outside of the tire. If you fail to fasten the inside cable, not only can you damage your vehicle, that part of the chain can become wound around your brake lines, and you’ll be well and truly stuck until you disentangle it. This doesn’t apply to snow socks. Snow socks simply slide onto the outside of the tire.
- Bring a few extras for ease and comfort.
- Plastic tarp or trash bag. Spread this out on the ground to protect you from the snow and keep you dry while you’re working.
- Tight-fitting gloves. Metal chains and cables will be cold, and it’s nice to have some protection for your hands while you work.
- A headlamp. If you need to install your chains after dark you’ll appreciate having a hand-free light source.
- For chains: A pair of pliers. These can be handy to grab and pull the cables tight.
- For chains: You can get special snow chain tensioner bungees with many hooks that will keep you chains snugged up tightly against your tires. You can get the same effect by pulling hard to get your chains tight, but this makes it easier.
General Tips for Driving in the Snow and With Chains
When it comes to winter driving, slow and steady wins the race. If you’ve done any driving in the snow, you’ll know that there are a few simple rules for driving on snowy surfaces.
- Tires matter. If you have relatively new all-weather tires the traction in snow is going to be noticeably better than if you’re driving around on street slicks or bald tires. That’s why the R1 designation includes the clause about a 6/32 inch tread depth required to skip putting on chains. Take a look at your tires before you drive to the park.
- Chains don’t make you invincible. If your chained front wheels stop but your rear wheels keep going, you can still end up in a situation you don’t want to be in. Drive conservatively and don’t make quick turns or stops, even with chains on.
- Take it easy. Not too fast, but also not too slow. Generally speaking, the faster you’re going the harder it will be to stick to the corners. However, on banked turns you will want to maintain some speed or you run the risk of sliding down the bank into the other lane. The speed limit for all chain control areas is 25 mph, regardless of what the normally posted speed is.
- Hang back. Plan to leave considerably more space than usual between your car and the car in front of you. This is a good idea in the mountains anyway, when other vehicles might brake unexpectedly for animals or exceptional scenery, and especially important when you factor in snowy conditions. Note: AWD or 4WD are great in snow country because they make it easier for you to get going. However, that doesn’t actually increase your stopping power, so it’s still important to leave extra room between you and the car in front of you.
- To get going, start out slowly. You want your tires (or chains) to bite into the snow below, and it is much easier for them to do that if you try to inch out rather than hitting the gas and set the wheels spinning. A spinning wheel is just going to dig you deeper into soft snow and/or wreck your chains. If your wheels are spinning, ease off the gas and try again slowly. Sometimes you can you can rock your way out of a dip in the snow by using the accelerator the way you would pump a swing.
- Ease gently to a stop. Modern braking systems include ABS to help keep you from locking up the tires. A locked up tire provides little stopping power and no control. Work with the ABS technology by planning ahead and slowing down gradually. Avoid situations where you would have to brake hard.
That’s It! Enjoy your winter Yosemite experience!
The Redwoods in Yosemite cabins are located in the small town of Wawona. Wawona is high enough to receive a healthy helping of snow during the winter months. There is enough snow that you’ll love looking out the windows of your cozy cabin to see snowflakes floating gently through the air, and you’re close to the grand winter beauty in the park. At the same time, Wawona is low enough to remain more manageable than higher elevations in terms of driving and shoveling.
We hope we’ll see you here at The Redwoods In Yosemite for your next winter trip to Yosemite.
